dlib, imutils 패키지를 사용하면 얼굴 사진에서 각 부위를 인식할 수 있다.
나의 경우 눈, 눈썹, 피부색이 필요했는데 이를 한번 추출해보자.
0. 준비
pip로 dlib, imutils, opencv를 설치한다. 그리고 shape_predictor_68_face_landmarks.dat 파일을 다운받는다.
http://dlib.net/files/shape_predictor_68_face_landmarks.dat.bz2
1. 이미지 불러와서 얼굴에 68개의 점 찍기
detector = dlib.get_frontal_face_detector()
predictor = dlib.shape_predictor('shape_predictor_68_face_landmarks.dat')

img = cv2.imread(image)
rect = self.detector(cv2.cvtColor(self.img, cv2.COLOR_BGR2GRAY), 1)[0]

shape = predictor(cv2.cvtColor(self.img, cv2.COLOR_BGR2GRAY), rect)#68개의 점 찍기
shape = face_utils.shape_to_np(shape)
opencv는 RGB가 아닌 BGR로 이미지를 다루므로 후에 헷갈릴 것 같아서 Gray Scale로 교체하였다.
2. 찍은 점 사용하기
shape_predictor_68_face_landmarks.dat 으로 찍은 점의 위치는 다음과 같다.
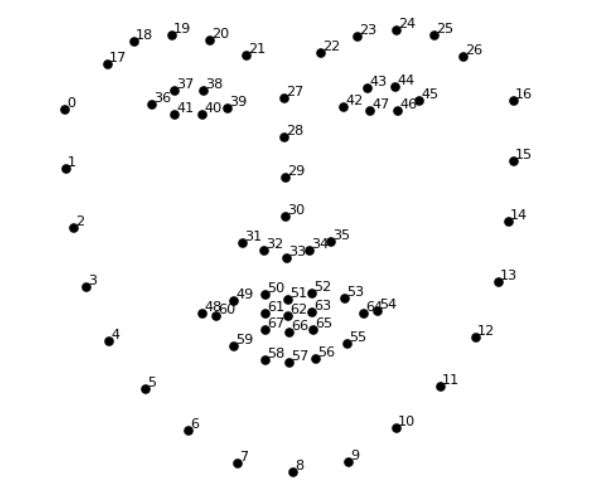
사용하고 싶은 점의 위치를 index로 가져와서 사용하면 된다.
left_cheek = self.img[shape[29][1]:shape[33][1], shape[4][0]:shape[48][0]]
right_cheek = self.img[shape[29][1]:shape[33][1], shape[54][0]:shape[12][0]]
3. 쉽게 가져오기
face_utils.FACIAL_LANDMARKS_IDXS 을 사용하면 더 쉽게 좌표를 가져올 수 있다.
(eyeStartLeft, eyeEndLeft) = face_utils.FACIAL_LANDMARKS_IDXS["left_eye"]
(eyeStartRight, eyeEndRight) = face_utils.FACIAL_LANDMARKS_IDXS["right_eye"]
(eyebrowStartLeft, eyebrowEndLeft) = face_utils.FACIAL_LANDMARKS_IDXS["left_eyebrow"]
(eyebrowStartRight, eyebrowEndRight) = face_utils.FACIAL_LANDMARKS_IDXS["right_eyebrow"]
FACIAL_LANDMARKS_IDXS는 mouth, right_eyebrow, left_eyebrow, right_eye, left_eye, nose, jaw로 구성되어 있고 이를 key로 불러오면 된다.
4. 클래스
관련 코드를 찾다보니 클래스로 만들어놓은 코드가 있어서 약간 수정해보았다.
class DetectFace:
    def __init__(self, image):
        self.detector = dlib.get_frontal_face_detector()
        self.predictor = dlib.shape_predictor('shape_predictor_68_face_landmarks.dat')

        #face detection part
        self.img = cv2.imread(image)
        if self.img.shape[0]>500:
            self.img = cv2.resize(self.img, dsize=(0,0), fx=0.8, fy=0.8)

        # init face parts
        self.right_eyebrow = []
        self.left_eyebrow = []
        self.right_eye = []
        self.left_eye = []
        self.left_cheek = []
        self.right_cheek = []

        # detect the face parts and set the variables
        self.detect_face_part()

    # return type : np.array
    def detect_face_part(self):
        face_parts = [[],[],[],[],[],[],[],[]]
        # detect faces in the grayscale image
        rect = self.detector(cv2.cvtColor(self.img, cv2.COLOR_BGR2GRAY), 1)[0]

        # determine the facial landmarks for the face region, then
        # convert the landmark (x, y)-coordinates to a NumPy array
        shape = self.predictor(cv2.cvtColor(self.img, cv2.COLOR_BGR2GRAY), rect)#68개의 점 찍기
        shape = face_utils.shape_to_np(shape)

        idx = 0
        # loop over the face parts individually
        for (name, (i, j)) in face_utils.FACIAL_LANDMARKS_IDXS.items():
            face_parts[idx] = shape[i:j]
            idx += 1
        face_parts = face_parts[1:5]
        # set the variables

        self.right_eyebrow = self.extract_face_part(face_parts[0])
        self.left_eyebrow = self.extract_face_part(face_parts[1])
        self.right_eye = self.extract_face_part(face_parts[2])
        self.left_eye = self.extract_face_part(face_parts[3])

        self.left_cheek = self.img[shape[29][1]:shape[33][1], shape[4][0]:shape[48][0]]
        self.right_cheek = self.img[shape[29][1]:shape[33][1], shape[54][0]:shape[12][0]]

    def extract_face_part(self, face_part_points):
        (x, y, w, h) = cv2.boundingRect(face_part_points)
        crop = self.img[y:y+h, x:x+w]
        adj_points = np.array([np.array([p[0]-x, p[1]-y]) for p in face_part_points])

        # Create an mask
        mask = np.zeros((crop.shape[0], crop.shape[1]))
        cv2.fillConvexPoly(mask, adj_points, 1)
        mask = mask.astype(np.bool)
        crop[np.logical_not(mask)] = [255, 0, 0]

        return crop
'기타' 카테고리의 다른 글
| keras load_model함수 버전 오류 (0) | 2020.09.26 |
|---|---|
| [패키지]dlib 설치하기 (0) | 2020.09.08 |
